新建子模块
[一]新建子模块概述
新建子模块是指在“多模块”工程中新增新的模块。
对于 Dante Cloud 来说,模块一般有两种类型:
- 常规模块:即为了隔离代码,提升代码的通用性,会将一部分代码迁移汇总到一个单独的模块,通过依赖这个模块实现代码的共享。这种模块就是这里所说的常规模块。
- 服务模块:即基于 Spring Boot 的服务模块,虽然称之为一个模块,但实际上这个模块其实是一个可以独立运行的应用。之所以采用模块的方式,是为了放置在同一个代码工程中,方便区分、调试、管理。
对于新建模块的方式,本文中主要包含两种方式:
- 工程内:指的是在现有 Dante Cloud 工程中新建模块。
- 工程外:指的是可以在 Dante Cloud 工程之外,其它的工程中新建模块。
提示
以下内容是基于 Maven 多模块工程创建子模块的案例说明
[二]在现有工程内,新建常规模块
[1]手工创建常规模块
- 在合适的位置,新建模块目录,例如:
dante-test - 在
dante-test业务模块下,新建pom.xml文件,以及src\main\java和src\main\resources目录 - 修改
dante-test业务模块下的pom.xml文件,添加 Maven 基础配置
<?xml version="1.0" encoding="UTF-8"?>
<project xmlns="http://maven.apache.org/POM/4.0.0"
         xmlns:xsi="http://www.w3.org/2001/XMLSchema-instance"
         xsi:schemaLocation="http://maven.apache.org/POM/4.0.0 http://maven.apache.org/xsd/maven-4.0.0.xsd">
    <modelVersion>4.0.0</modelVersion>

    // 根据子模块所在位置,指定其上级目录pom信息作为parent
    <parent>
        <artifactId>dante-cloud</artifactId>
        <groupId>cn.herodotus.dante</groupId>
        <version>X.X.X</version>
    </parent>

    <artifactId>dante-test</artifactId>
    <version>X.X.X</version> // 此处指定版本号,便于versions-maven-plugin统一修改
    <packaging>jar</packaging>

    <description>dante 微服务测试模块</description>

    <dependencies>
        <dependency>
            <groupId>commons-beanutils</groupId>
            <artifactId>commons-beanutils</artifactId>
        </dependency>
        ...
    </dependencies>

</project>- 找到
dante-test目录的上级目录中的 pom.xml 文件,在其中添加<modules>标签,以保持模块的联动依赖或编译
<modules>
    <module>dante-test</module>
</modules>- 在工程
dependencies目录下的 pom.xml 中,找到dependencyManagement下的
<!-- Dante Cloud --> 部分,添加模块声明
<dependency>
    <groupId>cn.herodotus.dante</groupId>
    <artifactId>dante-test</artifactId>
    <version>${project.version}</version>
</dependency>这样在其它模块中,就可以便捷的引用该模块,而且可以实现通过dependencies中的参数,统一控制模块版本。
<dependency>
    <groupId>cn.herodotus.dante</groupId>
    <artifactId>dante-test</artifactId>
</dependency>
[2]使用IDEA常规模块
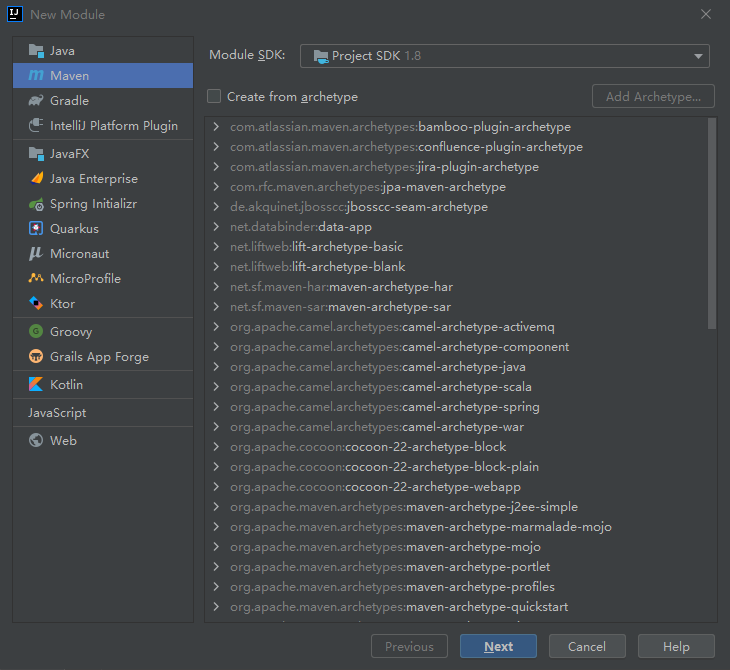
- 在 Idea 中,点击菜单
File -> New -> Module...,在弹出的对话框中选择,选择Maven,然后点击Next
2,在新的New Module窗口中,输入想要新建的模块名称,点击Finish按钮完成模块新建操作。
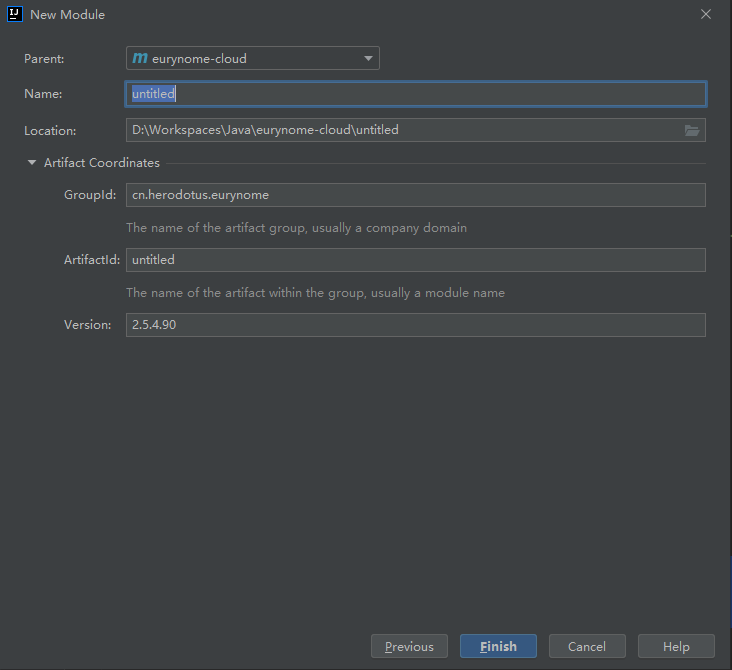
警告
输入完名称之后,一定要重新选择Parent内容,这决定了新建模块所在的位置和层次结构。
以上操作完成之后,会创建与“手工创建”章节结果相同。
在工程dependencies目录下的 pom.xml 中,找到dependencyManagement下的
<!-- Dante Cloud --> 部分,添加模块声明
<dependency>
    <groupId>cn.herodotus.dante</groupId>
    <artifactId>dante-test</artifactId>
    <version>${project.version}</version>
</dependency>这样在其它模块中,就可以便捷的引用该模块,而且可以实现通过dependencies中的参数,统一控制模块版本。
[三]在现有工程内,新建微服务模块
[1]手工新建服务模块
- 在合适的位置,新建模块目录,例如:
dante-test-ability - 在
dante-test-ability业务模块下,新建pom.xml文件,以及src\main\java和src\main\resources目录 - 修改
dante-test-ability 业务模块下的pom.xml文件,添加 Maven 基础配置
<?xml version="1.0" encoding="UTF-8"?>
<project xmlns="http://maven.apache.org/POM/4.0.0"
         xmlns:xsi="http://www.w3.org/2001/XMLSchema-instance"
         xsi:schemaLocation="http://maven.apache.org/POM/4.0.0 http://maven.apache.org/xsd/maven-4.0.0.xsd">
    <parent>
        <artifactId>dante-cloud</artifactId>
        <groupId>cn.herodotus.dante</groupId>
        <version>X.X.X</version>
    </parent>
    <modelVersion>4.0.0</modelVersion>

    <artifactId>herodotus-cloud-bpmn-ability</artifactId>
    <version>X.X.X</version>

    <description>dante-test-ability测试服务</description>

    <dependencies>
        <dependency>
            <groupId>cn.herodotus.cloud</groupId>
            <artifactId>authorization-servlet-spring-boot-starter</artifactId>
        </dependency>
        ......
    </dependencies>

    <build>
        <plugins>
            <!-- spring boot 默认插件 -->
            <plugin>
                <groupId>org.springframework.boot</groupId>
                <artifactId>spring-boot-maven-plugin</artifactId>
            </plugin>

            <!-- 拷贝插件 -->
            <plugin>
                <groupId>org.apache.maven.plugins</groupId>
                <artifactId>maven-antrun-plugin</artifactId>
            </plugin>

            <!-- Git信息记录插件 -->
            <plugin>
                <groupId>io.github.git-commit-id</groupId>
                <artifactId>git-commit-id-maven-plugin</artifactId>
            </plugin>
        </plugins>
    </build>

</project>
注意
authorization-servlet-spring-boot-starter 是所有"阻塞式"业务微服务启动运行,接入平台必须依赖的核心包。
- 找到
dante-test-ability目录的上级目录中的 pom.xml 文件,在其中添加<modules>标签,以保持模块的联动依赖或编译
<modules>
    <module>dante-test-ability</module>
</modules>- 在
src\main\resources目录下添加bootstrap.yml文件
spring:
  config:
    activate:
      on-profile: alibaba
  cloud:
    nacos:
      config:
        namespace: ${ALIBABA_NAMESPACE:@alibaba.namespace@}
        server-addr: ${ALIBABA_CONFIG_SERVER_ADDR:@alibaba.config.server-addr@}
        file-extension: yaml
        shared-configs:
          - data-id: herodotus-cloud-environment.yaml
            group: ${PROFILE:@profile@}
          - data-id: herodotus-cloud-platform.yaml
            group: common
          - data-id: herodotus-cloud-database-${DATABASE:@database@}.yaml
            group: common
          - data-id: herodotus-cloud-database.yaml
            group: common
          - data-id: herodotus-cloud-redis.yaml
            group: common
          - data-id: herodotus-cloud-cache.yaml
            group: common
          - data-id: herodotus-cloud-rest.yaml
            group: common
          - data-id: herodotus-cloud-kafka.yaml
            group: common
          - data-id: herodotus-cloud-social.yaml
            group: common
          - data-id: ${spring.application.name}.yaml
            group: service
      discovery:
        namespace: ${ALIBABA_NAMESPACE:@alibaba.namespace@}
        server-addr: ${ALIBABA_DISCOVERY_SERVER_ADDR:@alibaba.discovery.server-addr@}
    sentinel:
      transport:
        port: 8719
        dashboard: ${ALIBABA_SENTINEL_SERVER_ADDR:@alibaba.sentinel.server-addr@}
eager: true #服务注启动,直接注册到dashboard- 在
cn.herodotus.dante.test.ability 包下面添加启动类
package cn.herodotus.dante.test.ability;

import org.springframework.boot.SpringApplication;
import org.springframework.boot.autoconfigure.SpringBootApplication;

@SpringBootApplication
public class TestApplication {

    public static void main(String[] args) {
        SpringApplication.run(TestApplication.class, args);
    }

}
[2]使用IDEA新建服务模块
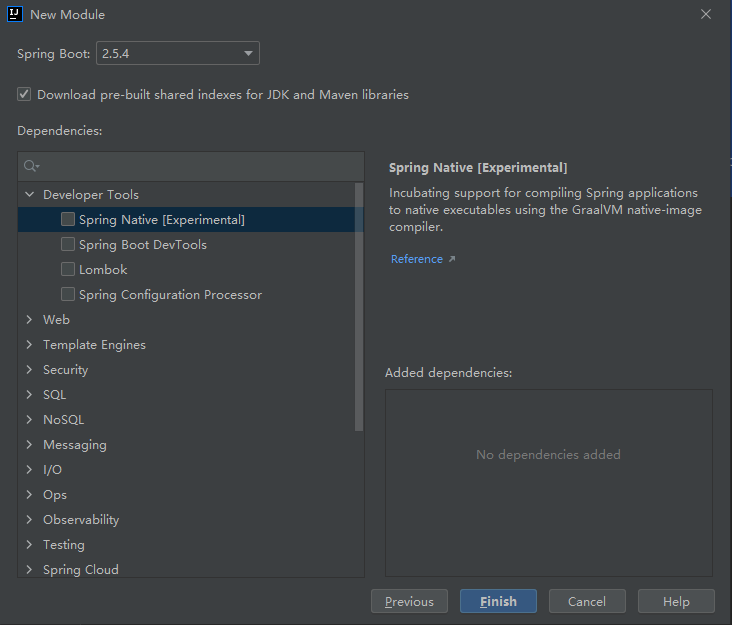
- 在 Idea 中,点击菜单
File -> New -> Module...,在弹出的对话框中选择,选择Spring Initializr,添加相关信息,然后点击Next

2,在新的New Module窗口中,选择想要添加的微服务相关依赖模块,点击Finish按钮完成模块新建操作。
提示
这里与前面【手工新建服务模块】章节描述的操作类似,都是通过点击菜单 File -> New -> Module...进行子模块的创建。因为是选择Spring Initializr,虽然操作路径一致,但是完全是按照创建一个新的Spring Boot进行操作,包括创建包的位置,Group,Artifact等信息都需要手工填写,也不会自动添加<modules>等关联信息。模块生成之后,还需要手动修改pom.xml。
使用该种方式的好处,是微服务工程所需要的代码结构,Application 服务启动类,
Edit Configuraitons...服务运行的默认配置都会帮助自动建好
- 修改
dante-test-ability业务模块下的pom.xml文件,添加 Maven 基础配置,修改 parent 依赖关系
<?xml version="1.0" encoding="UTF-8"?>
<project xmlns="http://maven.apache.org/POM/4.0.0"
         xmlns:xsi="http://www.w3.org/2001/XMLSchema-instance"
         xsi:schemaLocation="http://maven.apache.org/POM/4.0.0 http://maven.apache.org/xsd/maven-4.0.0.xsd">
    <parent>
        <artifactId>dante-cloud</artifactId>
        <groupId>cn.herodotus.dante</groupId>
        <version>X.X.X</version>
    </parent>
    <modelVersion>4.0.0</modelVersion>

    <artifactId>herodotus-cloud-bpmn-ability</artifactId>
    <version>X.X.X</version>

    <description>dante-test-ability测试服务</description>

    <dependencies>
        <dependency>
            <groupId>cn.herodotus.cloud</groupId>
            <artifactId>authorization-servlet-spring-boot-starter</artifactId>
        </dependency>
        ......
    </dependencies>

    <build>
        <plugins>
            <!-- spring boot 默认插件 -->
            <plugin>
                <groupId>org.springframework.boot</groupId>
                <artifactId>spring-boot-maven-plugin</artifactId>
            </plugin>

            <!-- 拷贝插件 -->
            <plugin>
                <groupId>org.apache.maven.plugins</groupId>
                <artifactId>maven-antrun-plugin</artifactId>
            </plugin>

            <!-- Git信息记录插件 -->
            <plugin>
                <groupId>io.github.git-commit-id</groupId>
                <artifactId>git-commit-id-maven-plugin</artifactId>
            </plugin>
        </plugins>
    </build>

</project>
注意
authorization-servlet-spring-boot-starter是所有业务微服务启动运行,接入平台必须依赖的核心包
- 找到
dante-test-ability目录的上级目录中的pom.xml文件,在其中添加<modules>标签,以保持模块的联动依赖或编译
<modules>
    <module>dante-test-ability</module>
</modules>- 在
src\main\resources目录下,新建bootstrap.yml文件并删除自动生成的application.properties文件,或者将自动生成的application.properties文件重命名为bootstrap.yml
spring:
  config:
    activate:
      on-profile: alibaba
  cloud:
    nacos:
      config:
        namespace: ${ALIBABA_NAMESPACE:@alibaba.namespace@}
        server-addr: ${ALIBABA_CONFIG_SERVER_ADDR:@alibaba.config.server-addr@}
        file-extension: yaml
        shared-configs:
          - data-id: herodotus-cloud-environment.yaml
            group: ${PROFILE:@profile@}
          - data-id: herodotus-cloud-platform.yaml
            group: common
          - data-id: herodotus-cloud-database-${DATABASE:@database@}.yaml
            group: common
          - data-id: herodotus-cloud-database.yaml
            group: common
          - data-id: herodotus-cloud-redis.yaml
            group: common
          - data-id: herodotus-cloud-cache.yaml
            group: common
          - data-id: herodotus-cloud-rest.yaml
            group: common
          - data-id: herodotus-cloud-kafka.yaml
            group: common
          - data-id: herodotus-cloud-social.yaml
            group: common
          - data-id: ${spring.application.name}.yaml
            group: service
      discovery:
        namespace: ${ALIBABA_NAMESPACE:@alibaba.namespace@}
        server-addr: ${ALIBABA_DISCOVERY_SERVER_ADDR:@alibaba.discovery.server-addr@}
    sentinel:
      transport:
        port: 8719
        dashboard: ${ALIBABA_SENTINEL_SERVER_ADDR:@alibaba.sentinel.server-addr@}
      eager: true #服务注启动,直接注册到dashboard
[四]在现有工程外,新建微服务独立模块工程
提示
现有工程外(herodotus-cloud工程外部)建立微服务工程,需要依赖于herodotus-cloud代码,因此需要使用mvn install 命令正确编译过herodotus-cloud工程,确保 Maven 本地缓存(Maven Repository)或者独立部署的 Maven 仓库中存在已经编译好的herodotus-cloud工程代码。
- 在
Idea中,点击菜单File -> New -> Module...,在弹出的对话框中选择,选择Spring Initializr,添加相关信息,然后点击Next
- 在新的
New Module窗口中,选择想要添加的微服务相关依赖模块,点击Finish按钮完成模块新建操作。
- 修改新建业务模块下的
pom.xml文件中,添加 Maven 基础配置
<?xml version="1.0" encoding="UTF-8"?>
<project xmlns="http://maven.apache.org/POM/4.0.0" xmlns:xsi="http://www.w3.org/2001/XMLSchema-instance"
         xsi:schemaLocation="http://maven.apache.org/POM/4.0.0 https://maven.apache.org/xsd/maven-4.0.0.xsd">
    <modelVersion>4.0.0</modelVersion>

    <parent>
        <groupId>cn.herodotus.dante</groupId>
        <artifactId>dependencies</artifactId>
        <version>X.X.X</version>
    </parent>

    <artifactId>dante-test-ability</artifactId>
    <version>X.X.X</version>
    <packaging>jar</packaging>

    <description>dante-test-ability测试服务</description>

    <dependencies>
        <dependency>
            <groupId>cn.herodotus.cloud</groupId>
            <artifactId>authorization-servlet-spring-boot-starter</artifactId>
        </dependency>
        ......
    </dependencies>

    <build>
        <plugins>
            <!-- spring boot 默认插件 -->
            <plugin>
                <groupId>org.springframework.boot</groupId>
                <artifactId>spring-boot-maven-plugin</artifactId>
            </plugin>

            <!-- 拷贝插件 -->
            <plugin>
                <groupId>org.apache.maven.plugins</groupId>
                <artifactId>maven-antrun-plugin</artifactId>
            </plugin>

            <!-- Git信息记录插件 -->
            <plugin>
                <groupId>io.github.git-commit-id</groupId>
                <artifactId>git-commit-id-maven-plugin</artifactId>
            </plugin>
        </plugins>
    </build>

</project>- 在
src\main\resources目录下,新建bootstrap.yml文件并删除自动生成的application.properties文件,或者将自动生成的application.properties文件重命名为bootstrap.yml
spring:
  config:
    activate:
      on-profile: alibaba
  cloud:
    nacos:
      config:
        namespace: ${ALIBABA_NAMESPACE:@alibaba.namespace@}
        server-addr: ${ALIBABA_CONFIG_SERVER_ADDR:@alibaba.config.server-addr@}
        file-extension: yaml
        shared-configs:
          - data-id: herodotus-cloud-environment.yaml
            group: ${PROFILE:@profile@}
          - data-id: herodotus-cloud-platform.yaml
            group: common
          - data-id: herodotus-cloud-database-${DATABASE:@database@}.yaml
            group: common
          - data-id: herodotus-cloud-database.yaml
            group: common
          - data-id: herodotus-cloud-redis.yaml
            group: common
          - data-id: herodotus-cloud-cache.yaml
            group: common
          - data-id: herodotus-cloud-rest.yaml
            group: common
          - data-id: herodotus-cloud-kafka.yaml
            group: common
          - data-id: herodotus-cloud-social.yaml
            group: common
          - data-id: ${spring.application.name}.yaml
            group: service
      discovery:
        namespace: ${ALIBABA_NAMESPACE:@alibaba.namespace@}
        server-addr: ${ALIBABA_DISCOVERY_SERVER_ADDR:@alibaba.discovery.server-addr@}
    sentinel:
      transport:
        port: 8719
        dashboard: ${ALIBABA_SENTINEL_SERVER_ADDR:@alibaba.sentinel.server-addr@}
      eager: true #服务注启动,直接注册到dashboard